How to Set Up a Cartridge
Five steps, about half an hour, and one printed protractor. Done properly, this is what decides whether an upgrade sounds like one.
How this is funded: we earn a commission if you buy through our links, at no extra cost to you. It never changes which product we recommend, and we’ll tell you plainly when to skip one. Full disclosure.
Fitting a cartridge is the one job in vinyl that genuinely rewards care. A micro-linear stylus mounted a few degrees off sits in the groove at the wrong angle, which loses exactly the detail you paid for and wears both stylus and record unevenly. The same cartridge aligned properly does everything it was designed to do.
It takes about half an hour the first time and ten minutes after that. You need one thing you may not have: an alignment protractor. Many turntables ship with one; printable versions are widely available and work fine provided you print at 100 percent scale with page scaling switched off.
Before you start
- Unplug the turntable and leave the stylus guard on until the alignment step.
- Work on a level surface with good light. A phone torch angled across the protractor helps enormously when reading the null points.
- Find the specification.You need the cartridge’s recommended tracking force before you start, not halfway through.
- Have a small screwdriver that fits the headshell screws. Cartridge screws are easy to round off with the wrong tool.
Step 1 — Wire and mount the cartridge
Four thin lead wires connect the tonearm to the cartridge pins, and the colors are standardized: white to left positive, blue to left negative, red to right positive, green to right negative. The clips are delicate; grip the metal collar with tweezers or fine pliers, never pull on the wire.
Then fit the cartridge into the headshell with its two screws. Leave them justloose enough that the cartridge can still slide forward and backward in the slots — you are about to move it. Cartridges with threaded bodies, like the Audio-Technica VM95 range, make this considerably easier because there are no nuts to hold in place.
Step 2 — Overhang and alignment
This is the step that matters most. A pivoted tonearm swings in an arc while a record groove is a spiral, so the stylus can only be exactly tangent to the groove at two points on the record. Those are the null points, and alignment means positioning the cartridge so the stylus hits both.
- Place the protractor over the spindle so it sits flat.
- Lower the stylus gently onto the outer null point.
- Slide the cartridge forward or back in the headshell until the stylus tip sits exactly on the point, and the cartridge body sits square with the grid lines printed around it.
- Repeat at the inner null point. It will usually be slightly off; adjust, then go back and check the outer point again.
- Iterate until both are right, then tighten the screws evenly — alternate between them so the cartridge does not twist as you go.
Re-check alignment after tightening. Cartridges love to rotate a fraction of a degree on the final turn of the screw.
Step 3 — Azimuth
Crouch down and look at the cartridge head-on from the front of the deck. The body should be vertical, not leaning left or right. A tilted cartridge puts uneven pressure on the two groove walls, which shows up as poor channel balance and vague stereo imaging.
Most tonearms in this price range have no azimuth adjustment, so if it is visibly tilted the fix is to loosen the screws and reseat the cartridge squarely in the headshell. Small deviations are not worth chasing.
Step 4 — Balance the arm and set tracking force
Set anti-skate to zero first, or it will fight you.
- With the stylus guard on, lift the arm off its rest and hold it over the platter.
- Turn the counterweight until the arm floats level— neither sinking to the platter nor rising to the rest. Take your time; this is the reference point everything else depends on.
- Return the arm to its rest. Now hold the counterweight still and rotate only the numbered dial to zero. You are calibrating the scale, not moving the weight.
- Finally, turn the whole counterweight until the dial reads the tracking force your cartridge specifies.
Do not improvise a value. Too little force is not the safe option: a stylus that skitters in the groove distorts on loud passages and can damage groove walls more than a slightly heavy setting will. Use the number the manufacturer publishes.
Step 5 — Anti-skate
As a record plays, friction drags the arm inward toward the spindle. Uncorrected, that presses the stylus harder against the inner groove wall than the outer — uneven wear on your records, and one channel distorting before the other.
Set the anti-skate dial to roughly the same number as the tracking force. That is the manufacturer-intended starting point and it is close enough for essentially every domestic setup. Five seconds, and it is the setting most often left at zero by people who did not know it existed.
Check your work
Play something familiar and listen for three things:
- Sibilance.If “s” sounds spit or splash, particularly toward the middle of a side, alignment or tracking force is off.
- Channel balance. With a mono or centered vocal, the image should sit dead center. A pull to one side suggests azimuth or a lead wire.
- Inner-groove distortion. If the last track on a side is noticeably rougher than the first, re-check alignment at the inner null point.
If something is wrong and you cannot tell which setting caused it, the troubleshooting guideworks backward from the symptom. And if you are only changing the stylus rather than the whole cartridge, none of this applies — see how to replace a turntable stylus, which is a two-minute job.
Cartridges worth doing this for
Both use the same VM95 body, so once one is aligned on your arm, every future upgrade is a stylus swap with no realignment at all. Prices are live and dated.
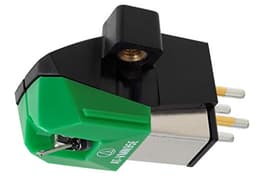
Audio-Technica AT-VM95E
The first cartridge upgrade for most decks
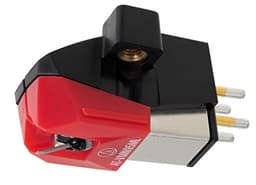
Audio-Technica AT-VM95ML
The biggest sound-per-dollar upgrade on an existing deck
Price as of October 15, 2026. #ad How we’re funded
Frequently asked questions
Do I need an alignment protractor to fit a cartridge?
Yes, if you are mounting the cartridge yourself. A protractor is how you set overhang and the correct angle relative to the groove. Many turntable manufacturers include one, and printable versions are widely available — print at 100% scale with no page scaling.
What tracking force should I use?
Whatever the cartridge manufacturer specifies, which is usually printed on the box and always on their product page. Typical moving-magnet cartridges fall between 1.5 and 2.5 grams. Do not guess and do not split the difference — set it to the recommended value.
Is too little tracking force safer than too much?
No — this is the most common misconception in vinyl. Too little force lets the stylus skitter in the groove, which distorts on loud passages and can do more damage than a slightly heavy setting. Correct, per the specification, is the only safe answer.
What does anti-skate do?
Friction between stylus and groove pulls the tonearm inward toward the spindle. Anti-skate applies a small outward force to cancel it, keeping stylus pressure even on both groove walls. Left at zero, you get uneven record wear and one channel distorting before the other.
What is azimuth on a turntable?
The side-to-side tilt of the cartridge. Viewed head-on, the cartridge body should be vertical so the stylus sits square in the groove. A tilted cartridge produces uneven channel balance and poor stereo separation. Most arms have no azimuth adjustment, so it is corrected by reseating the cartridge.
Do I need to use a digital stylus force gauge?
It is not required — the calibrated counterweight dial on most tonearms is accurate enough when the arm has been balanced correctly. A gauge is worth having if you own an advanced stylus profile, which is less forgiving of being a few tenths of a gram out.
Sources
- Elusive Disc — Turntable setup guide: tracking force & anti-skate — Step-by-step on balancing the tonearm, setting tracking force and anti-skate (accessed July 24, 2026)
- Crutchfield — Phono cartridge guide — Reference on cartridge types, styli and mounting (accessed July 24, 2026)
- Audio-Technica — AT-VM95E cartridge — Manufacturer specs: 0.3 x 0.7 mil elliptical stylus on an aluminum cantilever, 4.0 mV output at 1 kHz / 5 cm/sec, 1.8-2.2 g tracking force (2.0 g standard), 20-22,000 Hz, 20 dB channel separation at 1 kHz, half-inch mount, AT-VMN95E replacement stylus, and the maker's own statement that "all VM95 Series share the same body" so the stylus "can be replaced with any of the six interchangeable AT-VMN95 replacement styli". Re-read on the access date below, which corrected a tracking-force range previously noted here as 1.8-2.3 g (accessed September 26, 2026)
- Ortofon — 2M Red — Manufacturer specs: 5.5 mV output, 1.6-2.0 g tracking (1.8 g recommended), 47 kOhm load (accessed July 24, 2026)
Keep reading
The First 10 Records to Buy
The records to check your alignment against once it is set.
See the picksAre Turntable Cartridges Interchangeable?
The fitment check to run before you start unscrewing anything.
Read the explainerTurntable Headshells Explained
The part that turns this job into a table-top exercise.
Read the explainerHow to Set Up a Turntable
The deck around the cartridge — leveling, belt, speed and connection.
Read the guideBest Turntable Cartridges Under $200
What to fit once you know how to fit it.
See the picksHow to Replace a Turntable Stylus
The much shorter job — no protractor required.
Read the guideTurntable Troubleshooting
What each of these settings sounds like when it is wrong.
Fix itBest Stylus Force Gauges
Six gauges ranked on published accuracy and measuring height — and when the counterweight dial is already enough.
Choose a gauge